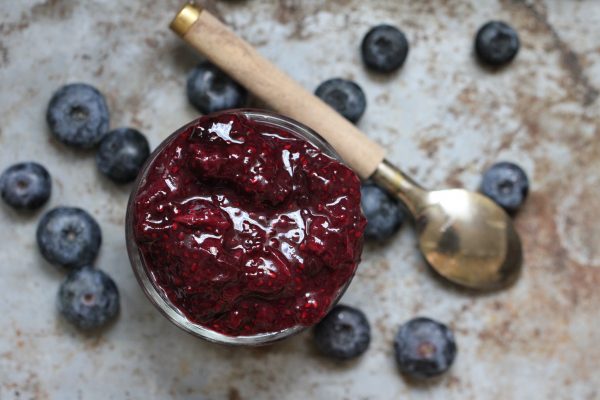
Posts

,

Blueberry Chia Jam

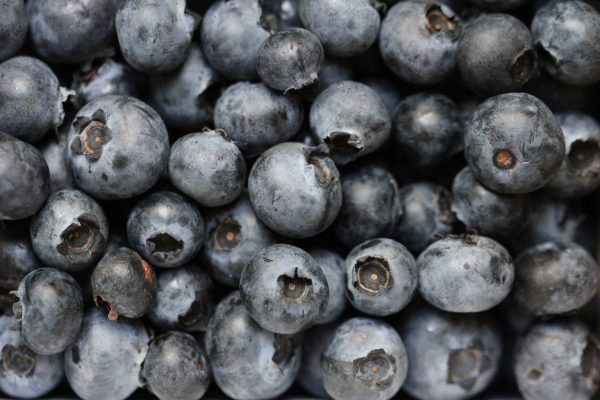
There has been a total blueberry obsession happening in this house this week. It started because I went to the organic shop & local blueberries were on offer in kilo large punnets at a seriously good price.

At the same time the baby decided that blueberries were her absolute total undisputed favourite thing to eat. Which also meant I seemed to constantly have a punnet of them in my basket/in the pram. When fruit is this bountiful my favorite thing to make is chia jam.

Chia jam is the best way to use fresh ripe fruit. You barely have to do a thing & yet you are gifted with a thick delicious multi purpose jam. Spread on toast, stirred through yoghurt, dolloped onto Bircher, eaten greedily straight from the pan (ummmmm…..), it’s enjoyment is endless.

After so much focus on lunch last week, this jam has really helped me up my breakfast game. I eat it topped with sliced almonds, the baby has some with oats. I love that it’s easy & quick to make and also that it keeps in the fridge for at least four days. My love for it is so great that I chose it to be my featured recipe when I was interviewed this week by the wonderful Erica over at “The Star Whisperer”. Erica is a London mama & her blog is a beautiful story board of fashion, lifestyle, design & brand tips. I’m so thrilled that she loves my recipes!

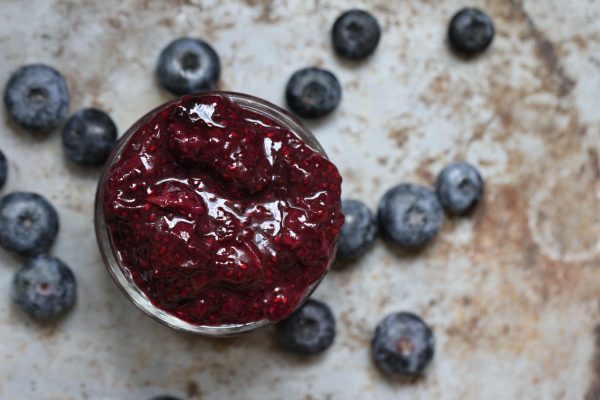
The great thing about chia jam is that you pick the flavor depending on what you need to use up. Blackberries are on their way in & work perfectly. As apples arrive at the end of the month simply stew, blend & add chia (and maybe a dash of cinnamon). Roasted nectarines that have been pureed would be delicious too. You choose, you only need three ingredients, one of which is water, and you are on your way to the perfect breakfast accompaniment.

Ingredients (10 -12 servings)
800g blueberries

4tbsp water

6tbsp chia seeds

Method
Place the fruit into a large pan with the water

Heat slowly and stir often until the fruit has softened & breaks apart

(If using a harder fruit, simply puree at this stage)

Remove from the heat

Add in the chia, stir well & leave to thicken (add more chia for a thicker consistency)

Store chilled in an airtight container for up to 4 days

Summer Corn Salad

Most days I shop with a list & a plan but sometimes it all goes out the window. Some days I walk into the “bio laden” planning to pick up the basics & I leave with a kilo of blueberries and a heap of corn on the cob.Those are the days when I get to play in the kitchen & when lunch is extra fun.

Corn on the cob makes me think of summer. Of barbecues and long, hot car journeys through the French countryside. Growing up we spent every summer in France, for the first years packed into a caravan with a pop up top, and then later in a 150 year old farm house that my parents fell in love with.

The house is in the middle of the countryside, surrounded by working farms. Corn is a huge crop and yet strangely it is grown there as animal feed. During the summer you see huge piles of corn on the cob, drying in the heat of the midday sun, ready to be fed to cattle.We were always the “crazy English” that were willing to pay for fresh corn and my parents were the “crazy English” willing to feed their children animal food.

This salad turned is delicious. The corn is fresh & lightly grilled. The avocado gives it a creaminess & teamed with the coriander and lime makes me think of LA Mexican inspired salads. The chickpeas are optional but I like the bite that they give and also the extra density that they add.

It’s the perfect satiating summer salad. I hope you like it as much as I do.

Ingredients (serves 2)
2 corn on the cob

2 tbsp rapeseed oil

1 avocado

10 cherry tomatoes

1/4 red onion finely chopped

1/2 tin chickpeas (129g cooked chickpeas)

2 tbsp olive oil

Small handful fresh coriander

Salt & pepper

Juice 1 lime

Method
Preheat your grill or griddle plan

Chop the avocado & place into a bowl with the quartered cherry tomatoes & finely chopped onion

Rub the corn with rapeseed oil & place under the grill or on the griddle

Watch closely & turn every 3 minutes or as the kernels start to colour

Once fully grilled remove & set aside for 5 minutes

Holding one end run a knife down the corn to remove the kernels into the bowl with the other vegetables

Mix everything together

Whisk together the lime juice, olive oil, salt & pepper

Finely chop the herbs & mix in with the dressing

Toss the salad with the dressing & eat immediately

Roasted tomato and hummus tartine

Moving to Munich has been great and scary and fun and lonely and exciting. On the one hand nothing could be greater than experiencing a new city with our new baby girl. On the other we said goodbye to our roots. Years of friends and relationships stayed in London. I no longer know the hidden spots or the shortcuts. I don’t know the easiest tube exits. I don’t know where to go to get the best coffee (actually I do, it’s Emilio’s on Buttermelcher str) and I haven’t mastered any Bavarian.

Having a baby in your home city is new enough & changes your perspective entirely on life. This move at 8 months pregnant has thrown me for a loop at times.

What’s more, I gave up my job…again. And now, from the trenches of teething & sleepless nights in trying hard to launch a brand. The second the baby shuts her eyes, I dash to the kitchen to cook and to photograph. Then I have to navigate the madness that is social media. Press releases, German magazine contacts, product placements….so much to think about & not enough caffeine to fuel it.

It’s hard, because it’s new. Because my support system is mainly available via what’s app. But I’m getting there, maybe, I think? A friend I value above most things made one of my recipes this week, that’s the greatest thing ever!

So todays lunch needed to be delicious. It needed to lift my mood and taste great. As always it needed to be healthy and hearty. Monday’s soda bread became today’s lunch. Toasted well and then topped with speedy hummus and delicious roasted tomatoes. The perfect lunch. Everything I needed it to be & able to be eaten single handedly. Make this if you can, whilst the summer is still here & tomatoes are at their peak.

Hummus & roasted tomato tartine

Ingredients
4 tbsp hummus

2 slices soda bread (or other bread) well toasted

4 ripe roma tomatoes (I like to roast a whole tray of tomatoes as they keep for 4 days in the fridge)

1 tbsp olive oil

Salt & pepper

Method
Preheat your oven to 180C

Slice the tomatoes into quarter wedges

Place into a baking dish

Coat with olive oil and season liberally

Roast for 25minutes

Remove & leave to cool for 10 mins

Spread the bread with hummus

Top with roasted tomatoes

Enjoy

Vegan soda bread

The kitchen table, as it often the case, becomes the centre point of our entire lives. It is, at various times of the day, littered with snippets of our lives. Its is scattered with bowls and dishes, laid for dinner, or strewn with an array of cycling bits and bobs. The chairs are placed at odd angles to allow the baby space to crawl underneath it and play den. It is at the table that we prepare food, write recipes, share large mugs of brewed espresso, eat and talk.
Lately when lunch time is on the horizon and we haven’t made it to the bakery, I turn to this soda bread recipe. It is hearty and sustaining, spread with hummus and topped with rocket, dipped in fresh beetroot soup or spread with lemony avocado and sprinkled with salt. It is a quick and simple answer. The joy in making soda bread is that you simply measure, stir, knead and bake. Warm, freshly baked bread on the table in an hour. It is the easiest bread to add to your weekly repertoire and you will not regret it.

Soda bread has a tangy fresh taste to it and that comes from the natural yogurt and the homemade butter milk that I use. You can buy buttermilk, but it takes five minutes to make – you simply add the juice of half a lemon (1.5 tbsp) to 200ml of milk (dairy or almond) and wait five minutes.

I made this bread using wholegrain flour but you can also make it with wholegrain spelt flour too. It is also delicious if you add a few tablespoons of seeds to the mix. This is my tried and tested recipe but feel free to tweak away.

Ingredients
500g wholemeal/spelt flour
1.5tsp bicarbonate of soda
150ml of live natural yogurt (you can replace this with an equal quantity of milk)
200ml of milk (dairy or almond)
1.5tbsp lemon juice

Method
Preheat your oven to 190degrees
Pour 200ml of milk (dairy or soya) into a jug and add 1.5tbsp of lemon juice
Leave for 5 minutes until buttermilk is formed
Sift the flour and the bicarbonate of soda into a large bowl
Make a well in the centre and add in the buttermilk and the yoghurt (if using)
Stir well with a wooden spoon and bring the mixture together, forming a soft dough
Tip onto a floured surface knead for a minute or two
Place onto a floured baking tray and dust the top of the bread liberally with flour
Bake for 40 – 45 minutes
You know the bread is ready if the base of the loaf sounds hollow when you tap it


No churn chocolate and almond icecream

Today I came to the conclusion that I do like almond butter, as long as it is mixed with dates, chocolate & coconut milk and then frozen. Basically I like it if it is turned into icecream!
I’ve never been able to get on the almond butter train till now, or the peanut butter train…and whilst I’m confessing I also don’t like avocados or plain coconut water or bullet proof coffee. I know they are all “superfoods” but in my mind, if they aren’t super for me, then they aren’t a super food.
Almond butter has, despite my aversion, often found its way into recipes. It works wonders in a dressing for Asian inspired salads or noodle dishes and it’s great in cookie dough as it yields a chewy consistency. I thought about trying it as an icecream ingredient because it’s high natural fat content makes it ideal for freezing as it will set but not rock solid.
This simple 7 ingredient ice cream is vegan, refined sugar free & also no churn, (because who needs another piece of kitchen equipment). I used almond butter and cacao but you could use peanut butter or maybe even seed butter if you are a nut free kitchen, you can even leave the nut butter out totally & sub in another milk. Instead of cocoa you could add in espresso and you can add in things too like cacao nibs or chocolate chips or freeze dried berries and chopped nuts.

We just put decking down in the garden and it’s been blissful to sit outside in the evening sun & eat icecream. It’s also surprising what a huge difference it makes to have icecream cones!!! Seriously an icecream at home game changer.

Next on the list is definitely homemade icecream cones….maybe with buckwheat flour? But I’m also currently obsessed with baked donuts so who knows what will be next out the kitchen

Ingredients
2 cans coconut milk chilled in the fridge overnight
16 dates pitted
80g raw/unsweetened cocoa
1 tsp pure vanilla extract
40ml unsweetened almond milk
4 tbsp almond butter
1 tbsp cinnamon

Method
Place the dates into hot water & leave to soak for 10mins until soft
Drain & then place into a food processor
Process until you have finely chopped dates then add in warm water until a thick paste forms
Open the coconut milk & with a spoon remove the solid top “cream” and place into a mixing bowl
Add in the rest of the ingredients including the date paste
Blend or mix well until all ingredients are well combined (easier with an electric blender)
Pour into a shallow dish & place into the freezer
Freeze overnight
Remove 15 mins before serving